Computers & Internet Blogs - OnToplist.com Blog Directory Blogging Fusion Blog Directory

Tuesday, January 29, 2019

CONVERT ANY DOCUMENT TYPE TO PDF

This post is about conveting any document into a PDF. So have you find difficult to convert images into PDF or any text document into PDF.

Its simple. This is for those who are beginners on computer and don't know how to convert images or text to PDF.

So lets do it.....

Open a blank word document and paste your content into the word document, whether its a picture or text.

Now what: See the image below

Copy your image to word document
After copying your image into word document, you have to go to file tab and select save as option.
There you will see to save document type, Select document type as pdf.

Now save at your selected location and its done. Your image has been converted into PDF format.

So that's was easy isn't it. So similarly you can change any image format or texts to PDF. Don't wait for softwares to do it. It is a simple trick about which most of the people are not aware of.

If you like my post's please follow our blog for more informations like this with simple tricks.


 Check my YouTube link below for designing:


Thumbnail       Logo      Menu cards     Create Gif images    Data Recovery     Take Screenshot 

Sunday, January 20, 2019

CONVERT IMAGE FORMATS *.png, *.Jpg,*.jpeg to *.ico FORMAT

CONVERT IMAGE FORMATS *.png, *.Jpg,*.jpeg to *.ico FORMAT

 Finding tough to change image formats. However many websites do it for free. Is it safe to upload your personal photo on other websites for changing image formats or compressing. I don't think so. Even the Google save your personal preferences and many data, why others will not.

To avoid such tension you can device your own methods to change image formats. Here i am demonstrating how to change your image format from *.png, *.jpg and *.jpeg to *.ico. 

*.ico file is icon format which is generally used as icon or logo of your company or websites.
Even you can set your personal icon in your blogger as favicon . You can see my blog have my icon in favicon instead of default blogger icon.

Yes you can do it yourself. Let's See HOW ?

First you have to create your logo (YOUTUBE TUTORIAL FOR CREATING LOGO) or any image (it can be your personal photo also) which you want to convert it in *.ico format.

Right click with mouse on the image and click on open with.. option. Now open the document with paint. 

This is how you will see the image:

HOW TO CHANGE IMAGE FORMAT
CONVERT IMAGE FORMAT
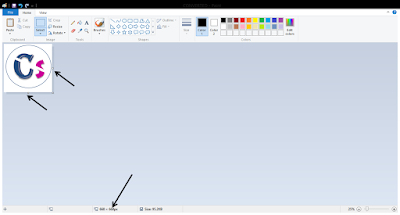
After Opening the image in your paint window, Drag the image to the corners and re-size it to the pixels required i.e. width and height of the image. Preferred size is 600 x 600 PX. See the image below for easy understanding.

HOW TO CHANGE IMAGE FORMAT
CONVERT IMAGE FORMAT- DRAG THE IMAGE AS PER REQUIRED HEIGHT
Suggestion:   Try to keep height and width size same as many web pages take only square image as their favicon Ex: blogger.


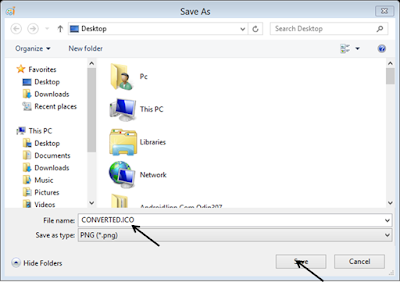
After the size of your image is done as per your required size, click file tab and click on the save as option and choose the option save as other formats. Now rename the file as per your choice and add the .ico extension after the name leave the save as type option to as it is. Now click save option.  See the image below:


HOW TO CHANGE IMAGE FORMAT
CONVERT IMAGE FORMAT- SAVE THE IMAGE AS .ICO TYPE
A caution window will open, anyhow click OK tab and proceed. See the image below:

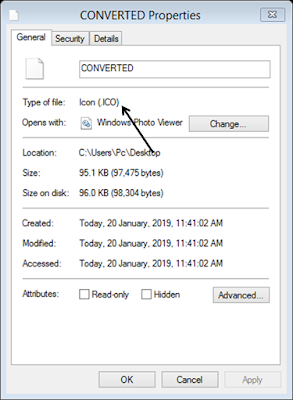
Now the check the image saved location and check the properties. You have done it ! converted your image format to *.ico and now use it at your web page and show the world your favicon i.e. favourite icon, your brand , your logo ..... see the image below:

HOW TO CHANGE IMAGE FORMAT
CONVERT IMAGE FORMAT- CHECK THE PROPERTIES OF YOUR IMAGE IT IS NOW *.ICO
So if you find this blog useful please leave a comment, so that i can keep posting for you. Check my YouTube link below for designing:


Thumbnail       Logo      Menu cards     Create Gif images    Data Recovery     Take Screenshot 

BLOGGING TUTORIALS


Sunday, January 13, 2019

CREATE YOUR OWN FAVICON EASILY

CREATE AND DESIGN YOUR OWN FAVICON EASILY

CREATE FAVICON LIKE A PRO


Above image is my favicon as well as my blog and YouTube channel logo. So how to create a favicon or logo. Its very easy to create your own logo. Don't be dependent on online websites for creating logo or favicon. I will teach you how with powerpoint you can create your own logo.

So lets begin :

Blogger site has conditions that for using favicon you should have a square image and less than 100 KB size. So i will also tell you how to get square image of your logo. Because when we draw a logo we are not sure of the size and width, height of the image. 

You are here at this blog that means you might me knowing what is favicon. If not let me show you in below photo:
                                               
HOW TO CREATE YOUR OWN FAVICON
Photo showing Favicons of blogger and my blog site

First step towards creating your favicon easily:

Open a blank slide in your Microsoft powerpoint window 

EASILY CREATE FAVICON
First step to create favicon easily : open a power point blank slide

Second step towards creating your favicon easily:

Now draw text box in the slide and type alphabet  of your site starting name. For my site it is computer solutions, So i will write C and S in the text box. Now from home tab select the size and font style for your logo design. Check the image below
how to create favicon easily
Second step to create favicon easily : Type the characters for your logo in text box

Third step towards creating your favicon easily:

Now insert some shapes to design your logo. I will cross a white strip inside as well as boundary circle for my logo to look better. Color the Circle matching to the background if it is white than color it to white. Boundary of circle can also be colored as per your choice. You can choose any other boundary shape also. Shapes are available in Insert tab of the powerpoint. See the image below :

how to create favicon easily
Third step to create favicon : Insert images and boundary as per your choice

Fourth step towards creating your favicon easily:

So have you completed designing or want to add more stuffs and decorations. Add per your choice, when you are done press Ctrl+A on keyboard and right click mouse on the selection and choose option save as picture. It will ask location to save, choose the location to save. and your logo as well as favicon is ready to use in your blog or website.

You can also create favicon online by visiting many website : Favicon generator

So if you find this blog useful please leave a comment, so that i can keep posting for you. Check my YouTube link below for designing:


Saturday, January 12, 2019

REMOVE BACKGROUND OF PHOTO EASILY AND HOW TO CHANGE BACKGROUND OF PHOTO

HOW TO REMOVE BACKGROUND OF PHOTO EASILY IN POWERPOINT (PHOTOSHOP NOT REQUIRED) CHANGE BACKGROUND OF YOUR IMAGE

Hey Friends !

Always found tough to remove background of photo or edit the background. Always asked begged your friends for photo editing softwares viz. photoshop. Always had to go to photo studio for snapshots or passport photos. 


So friends here i am bringing you the easiest way to remove background of your photo and you can edit it too with wonderful background or you can also place yourself with famous personalities.
So guys gear up for your practice for background editing

First step to remove background of photo : Open up your power point new blank slide.


First step to remove background of photo - Open blank power point slide

Second step to remove background of photo : Now copy the image on which you want to remove the background or edit the background


Second step to remove background of photo : Copy the image of which you want to remove background

Third step to remove background of photo : Now double click on the image, picture tools will open in your tool bar.

Now click the remove background tab shown in picture below


Third step to remove background of photo : Choose remove background option


Fourth step to remove background of photo : Now you will see the highlighted portion. Now select the option mark areas to keep. You can select the areas to keep my moving your mouse over the photo. 


Fourth step to remove background of photo : Select or mark the areas to keep on photo


Fifth step to remove background of photo :
 After selecting the areas to keep, click on the option save changes and you will see the background of your image removed very easily


Click on save changes

So you have learnt now to remove background of photo very easily in power point.

How to add background to your photo or change background of photo : Now what if i want to add another background to this image. So copy the image which you want to in the background and paste it on the slide on which you have removed the background and click right on the mouse and send it to back .


Change background of photo

So you have a different background pic press ctrl + A on the slide and right click mouse and save as picture. Now save this Picture on your computer and enjoy. So this is the easiest method to remove background of  photo in your powerpoint very easily. Hope this is easy for you as well.


All Done! This is how your image look like now

This is how your image look like. You can watch full video on this. Link is provided below↓:


Please comment if you found it really helpful for you.  Check my YouTube link below for designing: